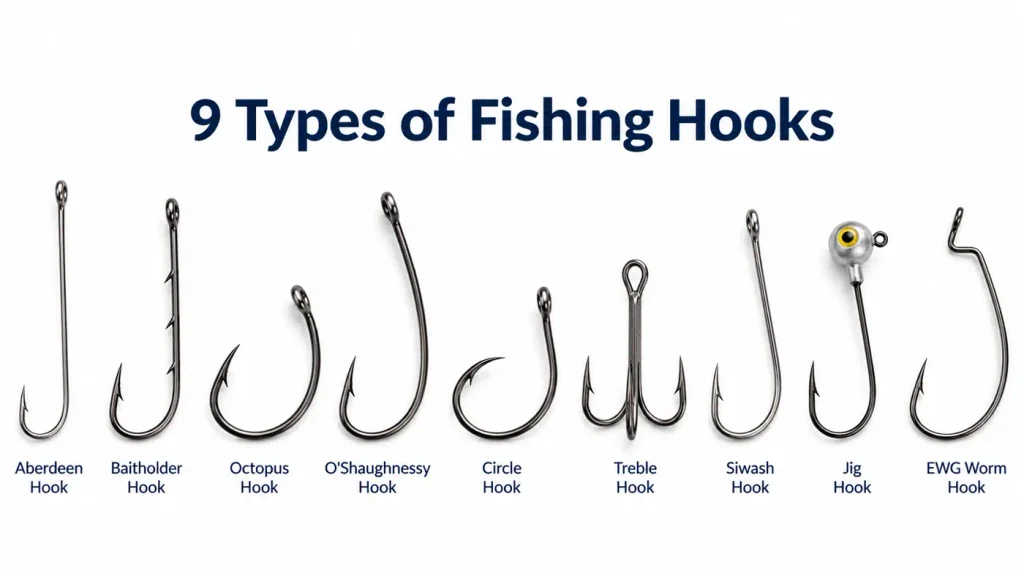
Nearly every hook-tying tutorial opens with the same move: thread the line through the eye. A spade end hook has no eye to thread. Its shank ends in a flattened blade with no opening of any kind, yet the pattern is still standard in competition angling and fine-wire bait fishing, sold from micro sizes up to heavy carp irons. Most modern Bait Hooks carry an eye, but the eyeless patterns have never gone away where presentation matters most.
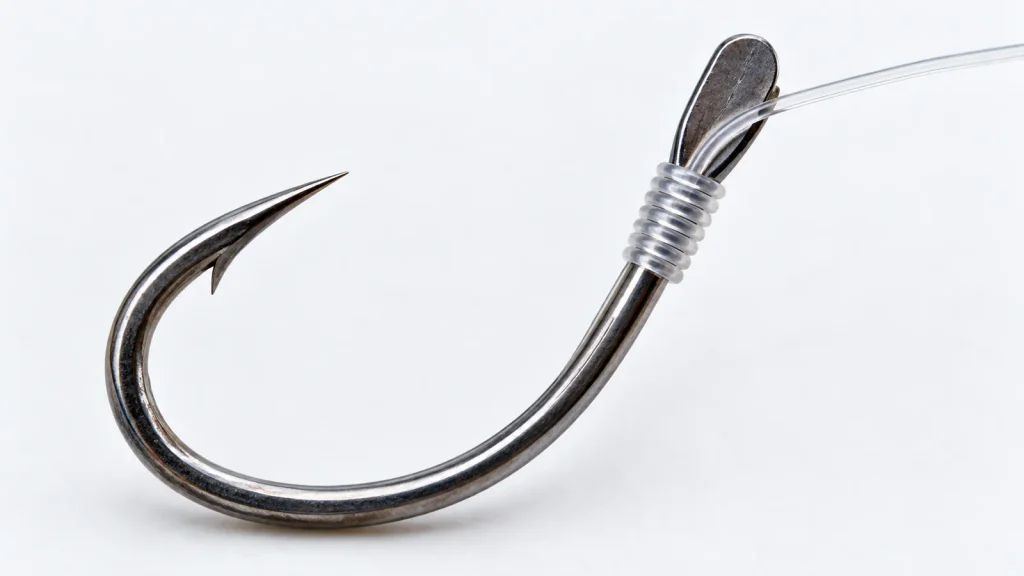
A fishing hook with no hole is tied by whipping rather than threading: the line is laid along the shank, wound several turns around both the shank and itself, passed back through the starting loop, then wetted and drawn down hard beneath the spade so the coils grip by friction alone. Nothing can pass through the head, so the knot has to clamp the shank instead of circling it, and every decision in the method follows from that constraint. The approach works on fine-wire Freshwater Hooks and on heavier irons alike, though the turn count changes with the wire.
What follows is the identification check, why the wrap holds, the eight hand steps, the turn count, and the cases where this knot is the wrong answer.
How to Identify a Spade End Hook
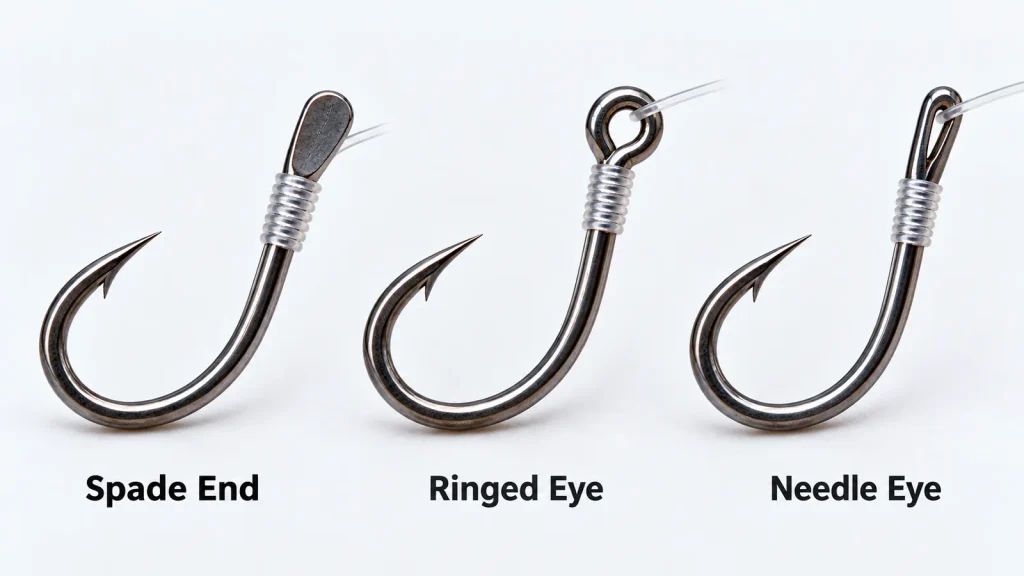
A spade end hook has a flat, widened blade at the top of the shank and no opening at all, a ringed eye has a closed loop with a visible hole, and a needle eye has a narrow slit that still accepts fine line. If daylight passes through the head, the hook is not eyeless, and this method is not the right one for it.
| Head type | What you see at the top of the shank | How the line attaches |
| Spade end | Flattened blade, solid metal, no gap | Whipped around the shank |
| Ringed eye | Closed loop with a gap behind it | Knotted through the loop |
| Needle eye | Narrow slit or oval hole | Threaded, then knotted |
The needle eye is where most people misjudge a hook, because at a glance it reads as solid, particularly on heavy saltwater patterns and dark-coated fly hooks. Test it with the line you actually intend to fish. If a strand passes through, tie an eyed-hook knot and ignore the rest of this guide. The standard overview of fish hook anatomy remains the clearest way to sort an unfamiliar head.
Why the Blade Has to Be Flat
A spade is a stop, not a fitting. Its shoulders stand wider than the shank so the topmost coil has something to butt against under load, which is why the head is flattened rather than rounded: a rounded bead would let the stack of coils ride over it, but a blade with square shoulders will not. The spade end is also the older of the two designs.
Why the Wraps Grip a Shank With Nothing to Thread
The whipping holds because each turn traps the standing part against the shank. Under load the coil tries to straighten and close onto the wire, and the top turn butts into the underside of the spade so the stack cannot travel upward. Grip comes from the length of the coil stack, not from a single locking tuck, which is why spacing and turn count matter more here than in any eyed-hook knot.
A clinch or a Palomar fails by sliding back out through a loop. A whipping has no loop to slide out of: it fails by the coils loosening, spreading apart or cutting into themselves, and each of those has a cause in how the turns were laid.
Why the Coils Must Sit Side by Side
Every turn has to enclose two things at once: the bare shank and the standing part running alongside it. That is what makes the stack self-locking, since each coil pinches the line that the next coil will pinch in turn. Crossed turns break that pattern. Instead of a continuous bed of friction, a crossed wrap leaves point contacts where load concentrates, the stack compresses unevenly as it is drawn down, and the knot creeps. Neat, touching, parallel turns are not cosmetic. They are the load path.
Why the Whipping Must Be Drawn Up Under the Spade
A whipping seated halfway down the shank still looks correct and will usually pass a hand pull. It is not secure. Under a real fish the stack migrates up the shank until it reaches the blade, and by then the turns have loosened, because travelling is what a loose coil does. Seat the knot hard against the underside of the spade from the start and confirm it has not moved before trimming.
Why the Exit Side Decides Whether the Line Survives
The line must leave the finished spade end hook knot on the inside face of the blade, the side the hook point faces. If it leaves on the outside, the edge of the spade bears directly on the line at the point of highest load and the wire acts as a cutting edge rather than a stop. This is the most common reason a join that tested fine in the hand fails on a fish.
Tying the Spade End Hook Knot by Hand in Eight Steps
Learning how to tie a fishing hook without a hole takes about a minute of movement once the pattern is familiar. Anchor the line, lay a loop along the shank, wind the tag end up toward the spade over both the shank and the loop, pass the tag back through the starting loop, wet it, draw it down, seat it under the blade and trim. Eight steps, and the one that decides whether the join survives a big fish is the exit side, not the turn count.
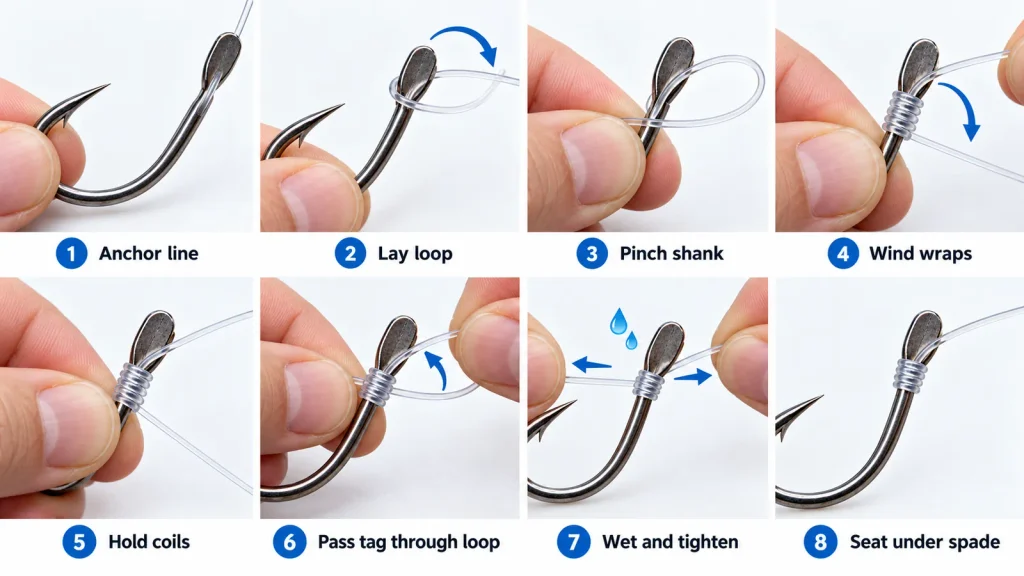
- Anchor the line. Hold the standing line under light tension against the spool or between finger and thumb. Slack during the wrap is the root cause of most uneven whippings.
- Lay a loop along the shank. Double the end of the line and hold it against the shank, loop pointing down past the bend, about 10 cm of tag free.
- Pinch the assembly. Trap loop and shank between thumb and forefinger with the standing part running under the loop, and keep that grip until the wrap is done.
- Wind toward the spade. Take the tag end up the shank toward the blade, over both the shank and the doubled line, each turn touching the one before it.
- Trap the coils. Pinch the finished wrap against the shank so nothing unwinds, then find the loop you started with at the bend end.
- Pass the tag through the loop. Feed the tag end through that starting loop, keeping the coils trapped.
- Wet and draw down. Moisten the whipping, then pull steadily on the standing part rather than the tag. The loop closes, the coils seat against one another and the tag is locked inside the loop.
- Seat, check and trim. Slide the knot up until it sits directly beneath the spade, confirm the line leaves the inside face, give it a firm test pull, then trim the tag short.
The sequence matches established references for this hook type, including the requirement that the line leave on the inside of the out-turned spade, as set out in this spade hook knot reference. A related eight-whip version, the Domhof, also works around the shank of an eyed hook, as this guide to the Domhof variant describes.
Seating Faults and What They Look Like
| What you see | What caused it | What to do |
| Knot slides down the shank | Seated below the blade, or too few turns | Retie and draw the whipping hard against the spade |
| Line parts cleanly at the blade | Line exiting on the outside face | Retie with the line leaving on the inside face |
| Coils cross or bunch | Tension lost between turns | Keep the tag taut and wind slowly |
| Looks tight but slips under a firm pull | Cinched dry, coil never fully seated | Wet it and pull steadily, not sharply |
Wrap Count Follows Line Diameter, Not Hook Size
Published guides give anything from five turns to ten for what appears to be the same hook, and both figures are right for their own line. The turns needed are set by how much shank the line has to cover, which depends on line diameter far more than on hook size. Fine line needs more turns to build the same holding length; heavy line fills the usable shank in a handful.
This is where standard advice turns misleading, because it is usually written as a table of hook sizes with a fixed turn count beside each. Two anglers on the same size 16 hook, one with 0.09 mm line and one with 0.22 mm, need very different numbers, and neither is doing it wrong.
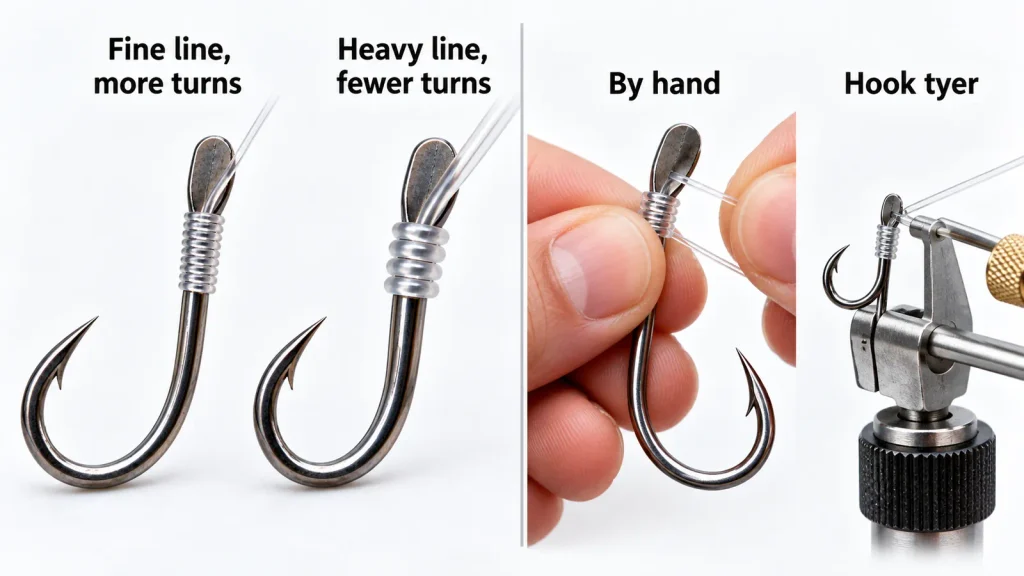
Fine Line, Many Turns
On a size 20 to 24 micro spade with 0.06 to 0.11 mm hooklength, each turn covers barely a tenth of a millimetre of shank. Building a holding bed of even one millimetre therefore takes eight to eleven turns, and the operation is genuinely awkward with cold, dry fingers. This is the range where hand tying is hardest and a tool earns its place.
Heavy Line, Few Turns
On a size 10 to 6 spade with 0.20 to 0.30 mm line, five to seven turns cover most of the usable shank, and adding more produces a bulky, stiff knot that sits badly against the bait. The arithmetic explains the disagreement in the guides: five turns of 0.25 mm line cover well over a millimetre of shank, while five turns of 0.08 mm line cover less than half of that, which is too short a bed to grip anything.
Reading the Whip Before You Cinch
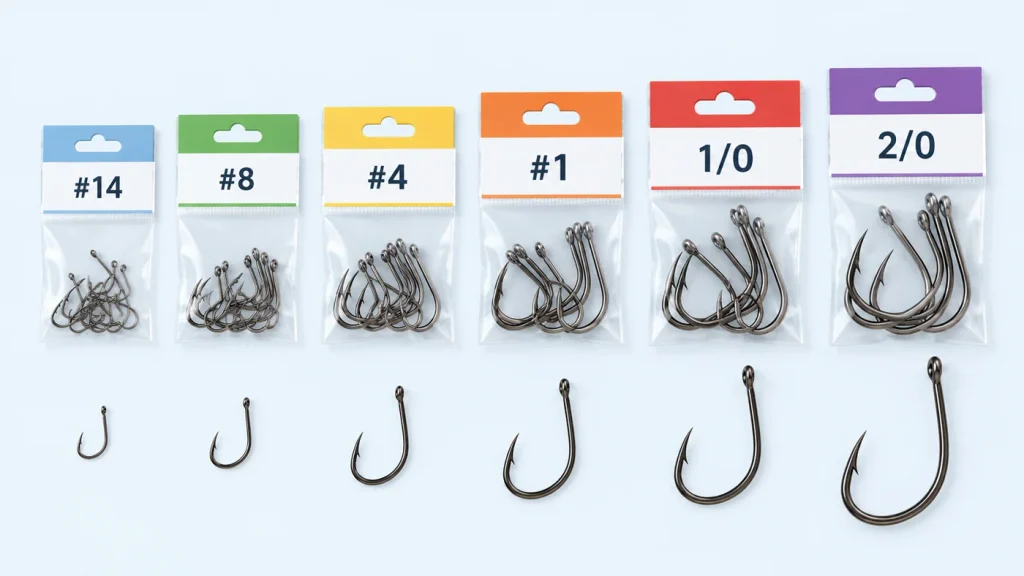
Before drawing the knot down, look at the bed of coils. They should cover most of the usable shank below the blade, run parallel with no gaps or overlaps, and stop short of the bend shoulder. If they run out of shank before you reach the intended count, the line is too heavy for that hook; move up a hook size. If you are unsure which size you are holding, the Fishing Hook Size Chart sets out how the numbering runs.
Hand Tying or a Hook Tyer
Hand tying is the right default above roughly a size 16 in good light, and a hook tyer pays for itself below about a size 18, in cold weather, and whenever you are pre-tying hooklengths in quantity. The tool does not change the knot. It only standardises the wrap and the tension during the draw-down.
| Factor | By hand | Hook tyer |
| Practical minimum size | About 18 to 16, smaller with practice | Size 22 and below |
| Speed per hook | Slow at first, quick once learned | Fast after a short setup |
| Consistency | Varies with fatigue and cold | Repeatable |
| Pre-tying dozens at home | Workable but slow | Clearly the better option |
| Line diameter tolerance | Any diameter | Best with fine mono and fluoro |
Where Each Method Wins
The tool clamps the hook so the shank cannot rotate while line goes round it, and holds the loop open at the bend end so the tag passes through without disturbing the coils. That removes the two steps that fail most often under pressure, which is why it earns its place in winter and in fine-diameter work, where one kink costs breaking strain. The hand keeps the advantage everywhere else: it gives direct feel for how the coils are seating, and it is faster for a single hook.
When the Whipping Knot Is the Wrong Choice
The whipping is the right join for fine mono and fluorocarbon on eyeless hooks fished for moderate-sized fish. It is the wrong answer for stiff heavy fluorocarbon, for braided hooklinks, for big-fish and snag work, and for any lure that has to swim freely. In each case the limitation comes from the material or from the movement the rig needs, not from the tying.
Stiff and Braided Materials
A whipping works by conforming. Stiff heavy fluorocarbon will not lie flat against a shank, so the coils stand proud, trap air and never form a continuous bed. Braid is the opposite problem: supple enough to wrap neatly, slick enough that the coils creep under sustained load, and a whipping has no locking tuck to stop them. Both want an eyed hook and the knot family that goes with it, covered in attaching a fishing hook to a line.
Why a Loop Knot Does Not Belong on a Spade End
A loop knot needs something the line can pass through and return from, which is precisely what a spade end does not provide. On an eyeless hook the workaround is to build the loop into the hooklength instead: form a small figure-eight loop at the free end of the hooklink, then join it loop to loop with the main line, or run the hooklink to a small swivel. That keeps the free movement a loop is for without forcing a loop knot onto a head that cannot accept one.
FAQ
What is the strongest knot for a spade end hook?
There is only one family of knots that works on an eyeless hook, so the question is not which knot to choose but how well the whipping is made. Holding power is governed by turns relative to line diameter, whether the coils are parallel and touching, whether the knot was wetted before the draw-down, and whether the line leaves on the inside face. Published knot-strength comparisons are built almost entirely around eyed hooks and do not transfer to this joint.
Are spade end hooks stronger than eyed hooks?
Not because of the join. What anglers actually notice comes from weight: an eyeless hook carries no metal loop, so it is lighter for the same wire gauge, which changes how a small bait falls and how the hook sits in the water. Whether the hook itself bends or straightens depends on wire gauge, temper and forging, not on the attachment.
Can you whip a spade end hook straight onto your main line?
Yes. The whipping does not care whether the line above it runs to a reel or to a swivel, and the method is identical. Most anglers still tie a separate hooklength, because a hook tied to the main line cannot be swapped without cutting back each time. Pre-tying hooklengths at home lets you set length and diameter, and means a broken hook costs a hooklength rather than a re-rig on the bank.